

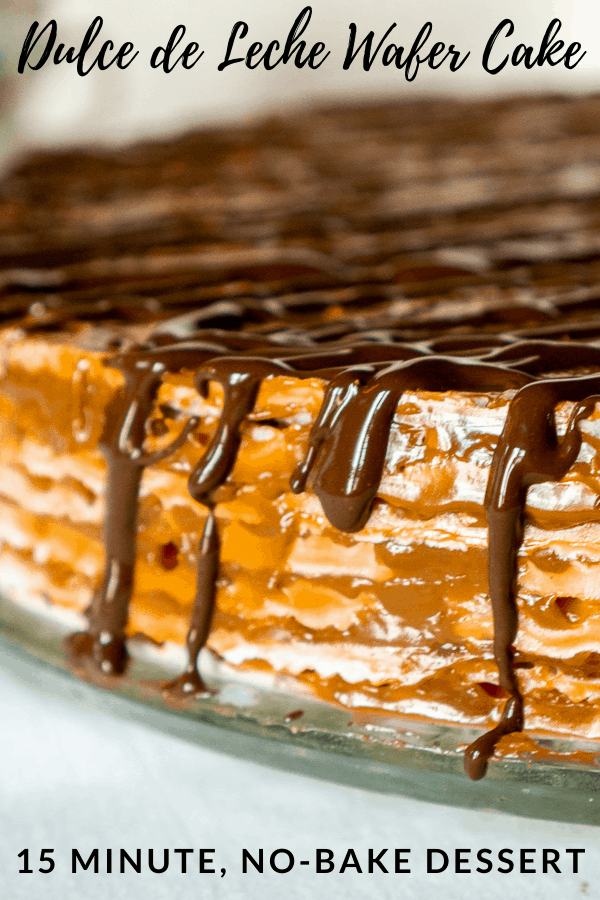
This easy Dulce de Leche Wafer Cake is made with just THREE ingredients and requires no baking. It can be prepared 1-2 days ahead and feeds a crowd. This has been a family favorite for generations, and is the easiest dulce de leche dessert you will ever make!


More easy 3-ingredient desserts: Ritz Cracker Thin Mints
This post was sponsored by AMERICAN HERITAGE® Chocolate as part of an Influencer Campaign for Influence Central and I am super excited to share this recipe with you!
I am so excited to share this special recipe with you this time of year: My grandma's Dulce de Leche Wafer Cake.
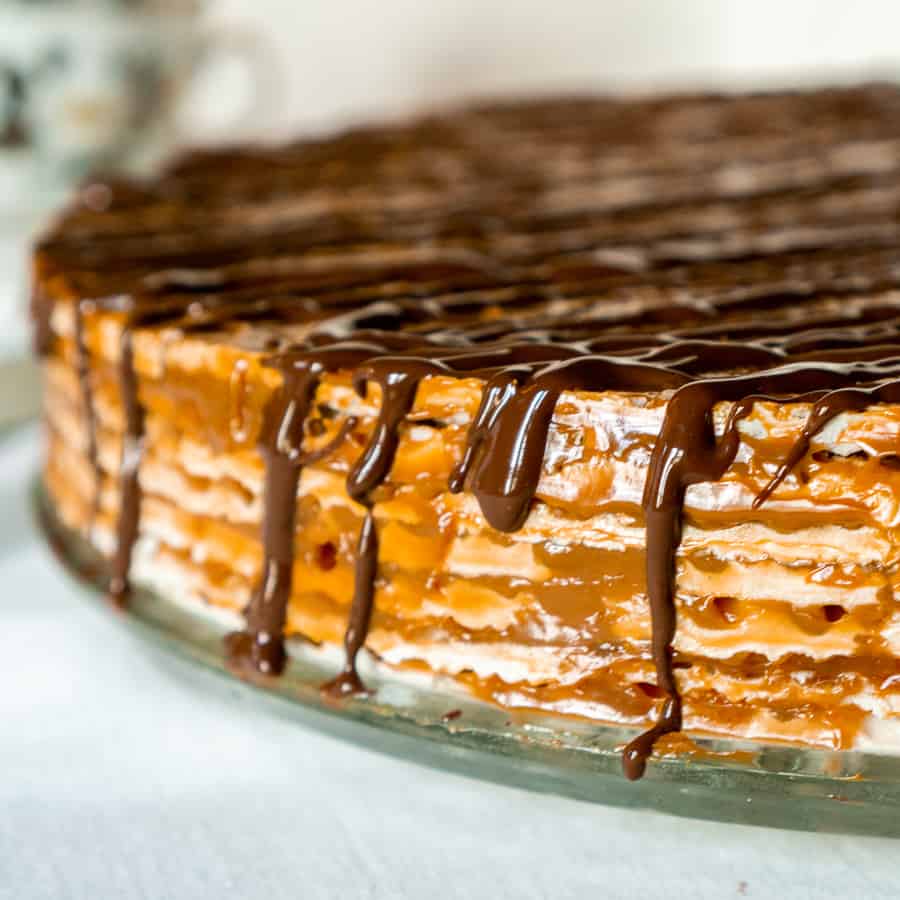
Layers of crispy wafers, sweet gooey dulce de leche, topped with delicious melted chocolate.
This waffle cake is the most delicious, chewy, gooey, chocolatey, caramely, crisp, and soft wafer cake ever. Yes, all of that at once. And more.
More showstopper desserts: Kiwi Cheesecake
Here's what else I love about this dulce de leche wafer cake:
- It is so easy to make, you don't even really need a recipe (but don't worry, I'll share the recipe with you!)
- It takes only 15 minutes to make
- It can be made up to 2 days in advance, so it's a great make-ahead dessert for busy holidays. The cake actually tastes better on Day 2 when the dulce de leche has had a chance to soak into the waffle layers
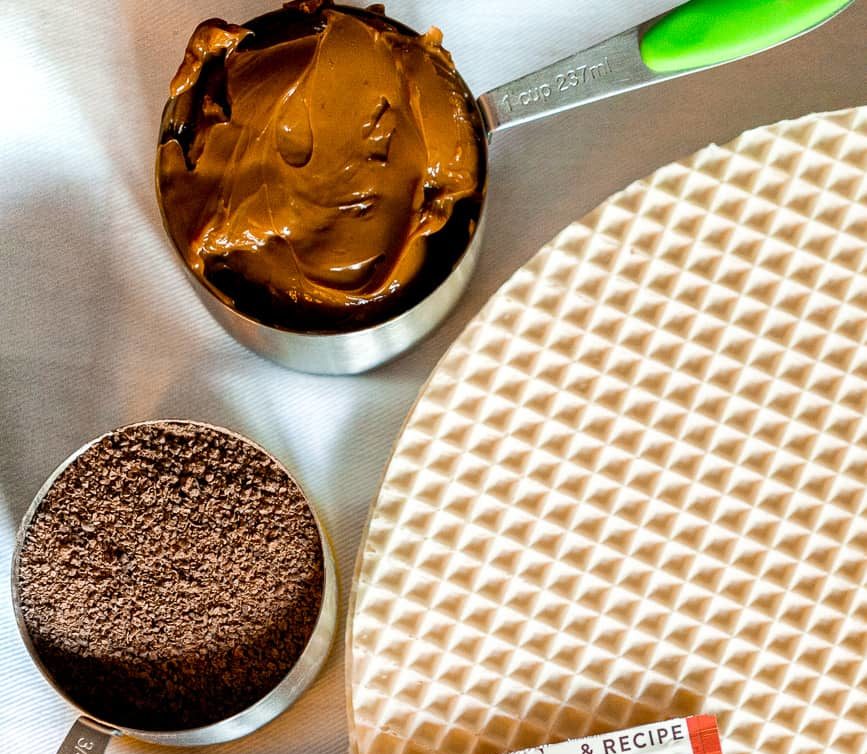
- It only has 3 main ingredients: Wafers (aka tort wafers or waffles), dulce de leche, and chocolate

Related recipe: No-Bake Blueberry Delight
Let's talk about each of these ingredients.
Wafers
For this recipe, I use Russian or Polish wafers, which are sometimes labeled as Tort Wafers on the packaging.
These are not the cookie wafers that already have layers of cream inside, nor are these the thick breakfast waffles. These are thin, crisp wafers without any filling. These tort wafers can be found in the ethnic food aisle of most large grocery stores. They are also available at Polish and Russian delis.
You can also buy them here on Amazon, but the price is definitely more expensive than in stores.
These wafers are available in many sizes and shapes, and they all work equally well for this recipe!
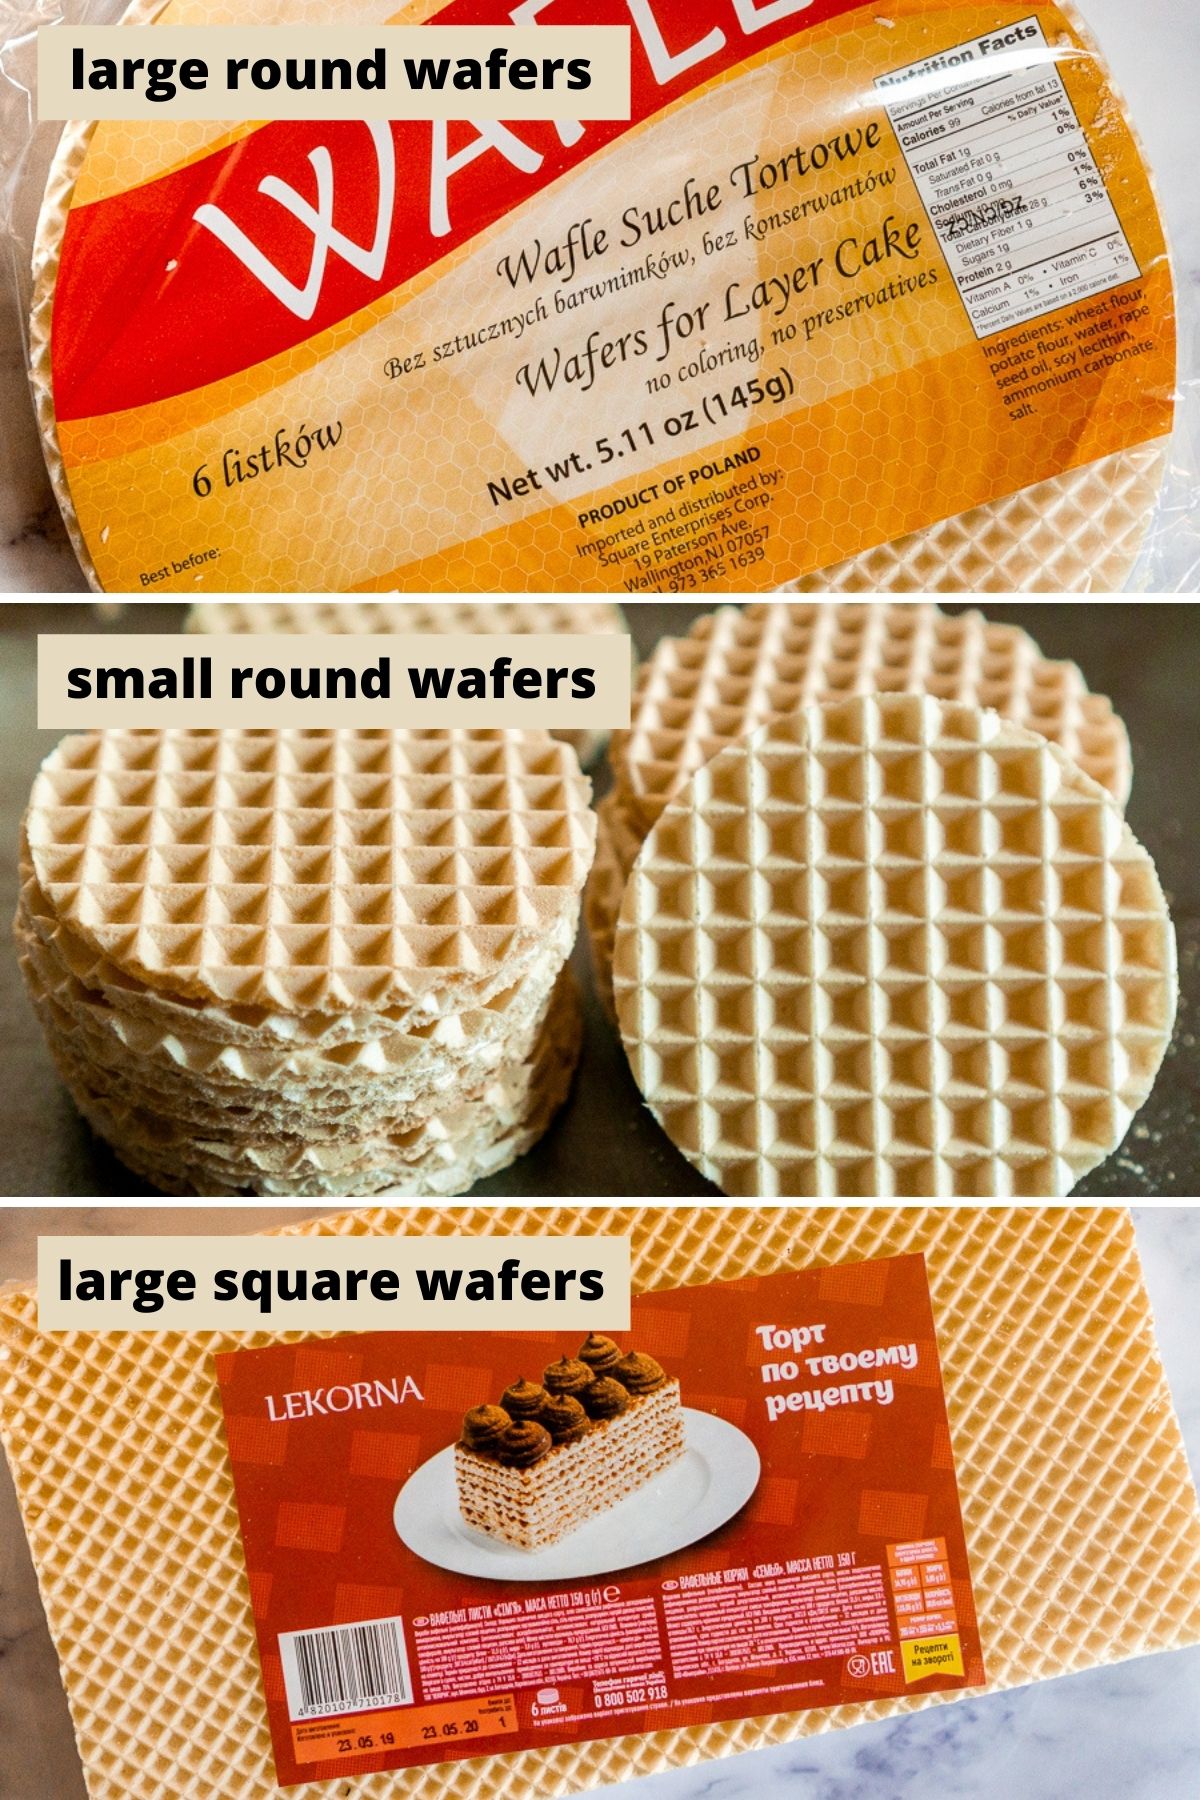

You can use large round wafers to make one large cake that can be sliced (like I did here!), or small ones to make individual little wafer cakes. Whatever size or shape is available at the store will work for this recipe, I promise.
A package of large wafers usually contains 6 waffles, which is perfect for making one large cake. Tip: I usually grab two packages just in case a wafer breaks in transit. Or, in case I want to make another cake immediately after devouring the first one.
For this recipe I used 11-inch round wafers and got sixteen generous slices of cake.
If you are buying small wafers, count on about 6 wafers per cake.
If you can't find these wafers in any shape or form, you can even use Pizzelle cookies to make this recipe!
More no-bake crowd-pleasing desserts: Chocolate Hummus Dessert Dip
Dulce de Leche:
You can buy or make dulce de leche for this recipe.
Where to find dulce de leche:
Any can, bottle, or jar of dulce de leche (caramel cream sauce) will work in this recipe. These are available either in the baking aisle or in the shelf-stable milk aisle in grocery stores.
Don't use caramel sauce though - that stuff is plain syrup and doesn't have that same smooth, rich condensed milk base as dulce de leche. Look for a caramel cream sauce made with milk.
This one from La Lechera is a classic, but there are many other brands available on Amazon if you don't want to look for it in stores.
You'll need about two 14-oz cans for a large waffle cake, or about two 14-oz cans for 6 smaller waffle cakes. I recommend that you grab 3 cans to be safe, just in case you end up using more on each layer. You don't want to run out while making this cake!
And of course, feel free to stir in a pinch of salt into the dulce de leche for that sweet-n-salty salted caramel goodness.
How to make Instant Pot dulce de leche:
Make sure you start with sweetened condensed milk, not evaporated milk.
- Remove the labels from the cans of condensed milk. Inspect the cans to make sure there are no dings in them. If there are, use a different can of condensed milk. This is because the cans will be under a lot of pressure as their contents heat up, and you don’t want them exploding if there are any weak spots in the cans.
- Place the cans on their side on the wire trivet/rack in the Instant Pot and fill the inner pot with water. Make sure the water level is well above the top of the cans of condensed milk but below the max fill line.
- Close the Instant Pot, set the valve to sealing, and cook on the manual setting at high pressure for 10 minutes.
- Allow for natural pressure release, then carefully open the Instant Pot and allow the water to cool down until comfortable to the touch.
- Remove the cans from the water. Open one can at a time (in case you don’t use the second one right away!). Stir the dulce de leche or process it in a blender for a few seconds to get it to be nice and creamy.
How to make stove-top dulce de leche
- Remove the labels from the cans of condensed milk. Inspect the cans to make sure there are no dings in them. If there are, use a different can of condensed milk.
- Place the cans on their side in a LARGE pot and fill it with water. Make sure the water level is well above the top of the cans of condensed milk.
- Bring the water to a boil, lower the heat, cover, and allow to simmer for 1 hour. Make sure that there always enough water in the pot to keep the cans fully submerged. If the water starts evaporating, add some more. This is super important!
- Allow the water to cool down to a temperature where you’re comfortable touching it, then remove the cans from the water. Allow the cans to come to room temperature before opening them.
- Open one can at a time (in case you don’t use the second one right away!). Stir the dulce de leche or process it in a blender for a few seconds to get it to be nice and creamy.
Chocolate
These cakes are topped with both melted and grated chocolate. Can we say YUM?!
I use American Heritage Finely Grated Chocolate for all of my recipes that require melted chocolate because it is SO easy to melt and it tastes amazing.
It contains spices such as vanilla, orange peel, and cinnamon, so it really adds a LOT of flavor to this recipe in addition to being a beautiful topping. The subtle spices go so well with the dulce de leche layers in this cake.
I love topping this cake with grated chocolate too, and if you've ever grated chocolate then you know what a pain-in-the-*** it is!
30-60 seconds in the microwave, a quick stir, and you have smooth, rich, lump-free melted chocolate goodness.
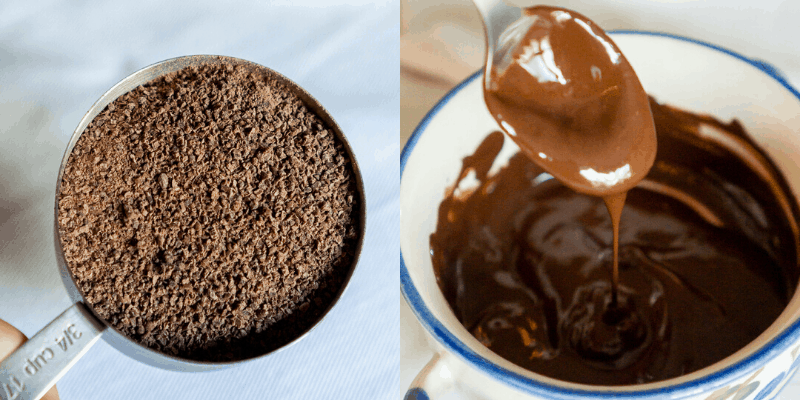

You can get American Heritage Chocolate here on Amazon, or use your preferred chocolate chips for melting. One bag goes a long way and I was able to use one bag for several different chocolate dessert recipes!
How to make Dulce de Leche Waffle Cake
This is literally the easiest dessert recipe you will EVER make.
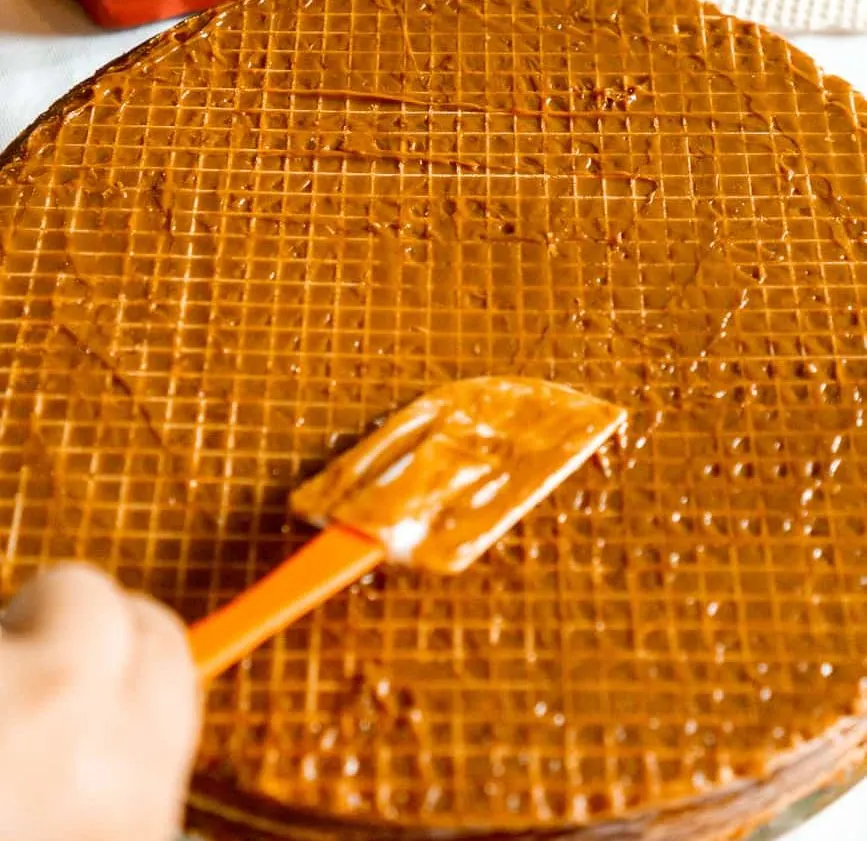
→ Simply spread dulce de leche over the waffles, layering them on top of each other.
This step should be done at least the night before you plan on serving the cake, so that the dulce de leche has a chance to soak into the waffles. You can choose to drizzle the cake with chocolate immediately, or do it right before serving, it doesn't make a difference!
→ To make the chocolate drizzle, just melt the chocolate in the microwave, stir in a teaspoon or two of coconut oil, and drizzle over the top of the cake. Garnish with additional grated chocolate.
That's it!

When my grandma makes this cake, she always makes her own dulce de leche from condensed milk and grates her own chocolate for the topping. I bet her grandma had to make wafer-thin waffles from scratch too. I am so glad I don't have to do any of that! All the ingredients for this easy dessert are available and ready to be used immediately.
More traditional Ukrainian and Russian recipes: Zapekanka (Farmer's Cheese Cheesecake)
How to store Dulce de Leche Waffle Cake:
The cake can be kept refrigerated or at a cool room temperature for up to 5 days, though I promise you it will not last that long.
Don't forget to bookmark this recipe for later!
Other easy dessert recipes you will love:
- Almond Joy hot chocolate bombs
- Twix hot cocoa bombs
- Eggnog creme brulee - 3 ingredients!
- Apple toffee cake
- Red velvet crinkle cookies - 4 ingredients!
- 2 Ingredient pumpkin muffins
- Red velvet mug cakes
- Triple chocolate cookies
- Perfect oatmeal cookies
- Cinnamon apple pie cups - a 2 ingredient dessert!
And if you're in the mood for some festive holiday drinks, I got you covered too!
If you enjoyed this recipe, let me know with a comment and a star rating below. And don't forget to share it on Facebook and on Pinterest:


Dulce de Leche Wafer Cake
Ingredients
- 6 Large tort wafers (11-12 inches across) - (also called waffles or wafers)
- 2 14-oz cans Dulce de leche - (such as La Lechera, also called caramel cream sauce), look for it in cans, jars, or bottles, or see notes below to make your own
- Optional: a pinch or two of salt
- ⅓ cup Chocolate chips - or chocolate chunks or grated chocolate
- 2 teaspoons Coconut oil
Special equipment
- Large plate or cake platter
Instructions
- Optional step if you want a salted caramel flavor: Combine all the dulce de leche in a bowl with a pinch of salt in a medium bowl. Stir well.
- Spread about ⅓ cup of dulce de leche over each wafer (exact amount needed per wafer will vary based on the wafer size, no need to measure exactly), gently pressing down with a spatula to get the caramel filling into all the nooks and crannies of the wafer, making sure to get the edges too.
- Top with another wafer, and repeat until you have 6 layers of wafer + dulce de leche. You can definitely make a smaller or taller cake by using fewer or more wafers!
- Melt a scant ⅓ cup of the chocolate in the microwave, 30 seconds at a time, stirring in between. (I needed 45 seconds total). Stir in 2 teaspoons of coconut oil.
- Drizzle the melted chocolate all over the cake. Optional: grate some chocolate and sprinkle that on top. Allow the cake to rest overnight in the refrigerator or a cool location so the dulce de leche soaks into the wafers. Slice and serve at room temperature.
Notes
- This cake is best prepared 1 day ahead so the dulce de leche has a chance to soak into the wafers
- I recommend getting an extra container of dulce de leche just in case you run out
- I recommend getting an extra package of wafers, in case one gets broken or you want to make a taller cake. Tip: If a wafer breaks cleanly, you can still use it in one of the middle layers, since the dulce de leche will glue the cake together. No one will be able to tell the difference. If a wafer gets smashed and is missing pieces, you might want to use a different one (dip that wafer into melted chocolate as a snack!!)
- Use leftover dulce de leche to dip apples, or stir into oatmeal
- Remove the labels from the cans of condensed milk. Inspect the cans to make sure there are no dents or dings in them. If there are, use a different can of condensed milk.
- Place the cans on their side on the wire trivet/rack in the Instant Pot and fill the inner pot with water well above the top of the cans but below the max fill line.
- Close the Instant Pot, set the valve to sealing, and cook on the manual setting at high pressure for 10 minutes.
- Allow for natural pressure release, then carefully open the Instant Pot and allow the water to cool down until comfortable to the touch.
- Remove the cans from the water. Open one can at a time (in case you don’t use the second one right away!). Stir the dulce de leche or process it in a blender for a few seconds to get it to be nice and creamy.
Nutrition
The nutritional information displayed is an estimate and not to be used as dietary or nutritional advice. Consult a nutritionist or dietician for nutritional info based on the exact ingredients you use.
Sheryl
Friday 18th of June 2021
I was so excited to make this cake for my book club since we’d just read a story that took place in Poland! The torte was super easy to assemble and I followed the directions exactly including preparing it the day before and refrigerating. The taste was delicious, but the wafers were not crispy and some thought that gave it a stale consistency. Is this the way it’s supposed to be?
Kate
Monday 28th of June 2021
Hi Sheryl, that's correct, the waffles absorb some of the caramel and don't stay crispy, they get a little soft. It's how the cake is supposed to be. If you want them crispy, just spread the dulce de leche on right before serving.
Todd
Sunday 23rd of August 2020
I made it with condensed milk that I boiled in the can. Also added chopped macadamia nuts on the top before drizzling the chocolate. It was amazing. I’m thinking of making a tiramisu version with custard and topped with espresso powder.
Kate
Sunday 23rd of August 2020
Hi Todd, so glad to hear you liked it! Chopped macadamia nuts sound amazing, I'll have to try that next time. Thanks so much for stopping by to let me know.